Key Takeaways
- Accessing Crosshair Settings: You can easily modify crosshair settings in CS2 by navigating to the Options menu, selecting Game Settings, and then the Crosshair tab for a visual interface.
- Console Commands for Customization: Advanced users can make precise changes to their crosshair using console commands, adjusting size, color, and more. These settings can be tweaked in real-time via the developer console.
- Static Crosshair: To keep your crosshair from expanding during movement or firing, use cl_crosshairstyle 4 for a static configuration.
- Copying Crosshairs: You can copy someone else’s crosshair in-game using the cl_crosshair_copy command, which instantly mimics the crosshair setup of another player.
- Best Crosshair Settings: Many players opt for a bright static crosshair with a small gap and a center dot for precise aiming. Customization allows for optimization based on personal preferences.
- Import/Export Crosshairs: You can save or import crosshairs by editing config files or using Steam Workshop crosshair maps
In CS2, your crosshair is a vital tool for aiming accuracy and gameplay precision. Customizing it can make a big difference in how you play, so let’s dive into how you can easily modify your crosshair in CS2.
How to Access Crosshair Settings in CS2
To access the crosshair settings in CS2, follow these simple steps:
1. Open the Options menu from the main screen.

2. Navigate to Game & Click Crosshair in Settings.
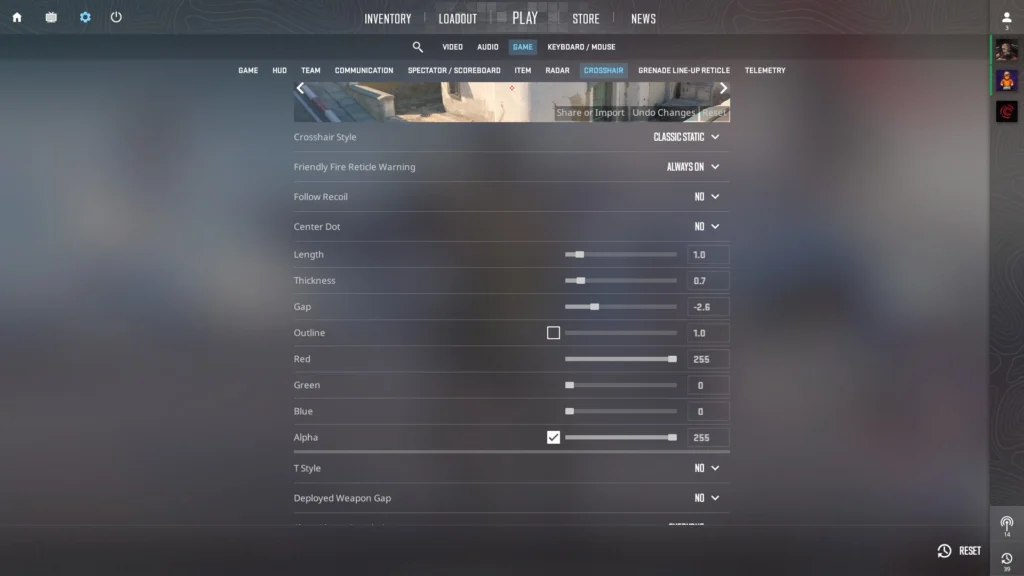
3. From here, you can adjust various crosshair settings such as size, style, and color. There’s a preview window so you can see the changes in real-time.
This visual interface is beginner-friendly and allows you to play around with different crosshair types, including the default and dynamic options, which can help you find your ideal settings(
CS2 Crosshair Console Commands
Advanced players often prefer using console commands to precisely customize their crosshair. Here’s a table of useful console commands to change the crosshair settings in CS2:
| Command | Description |
cl_crosshairsize X | Changes the size of the crosshair (replace X with the size value). |
cl_crosshaircolor X | Changes the color (0-5) of the crosshair. |
cl_crosshairthickness X | Adjusts the thickness of the crosshair lines. |
cl_crosshairgap X | Modifies the gap between the crosshair lines. |
cl_crosshairdot X | Adds/removes a center dot (1 = on, 0 = off). |
cl_crosshair_drawoutline X | Enables/disables the crosshair outline. |
cl_fixedcrosshairgap X | Moves the crosshair from the center. |
You can enable these commands by opening the console with the ~ key. Type the command and press ‘Enter’ to apply the change.
Furthermore: Anubis Map Callouts in CS2
How to Make Your Crosshair Not Move in CSGO
If you want your crosshair to remain static (not expand during movement or shooting), you can adjust this in your settings:
- Use the command:
cl_crosshairstyle 4for a static crosshair. This command turns off crosshair movement, giving you a steady crosshair regardless of movement or firing.
CS2 Default Crosshair
The default crosshair in CS2 is dynamic, meaning it expands when you move or shoot, indicating the reduced accuracy. For newer players, this setting works well, but more experienced players may switch to a classic static crosshair using the methods outlined above for better control.
Furthermore: Top Purple Loadout in CS2
How to Turn Off Movement Error in CSGO
To disable the crosshair movement error, you can use the following command:
cl_crosshairstyle 4orcl_crosshairgap_useweaponvalue 0. This will stop your crosshair from expanding when you move, so it remains static regardless of your actions.
How to Copy Someone’s Crosshair in CS2
If you see a crosshair you like during a game, you can easily copy it:
- Open the console (
~key). - Type
cl_crosshair_copy. This command copies the crosshair settings of the player you’re spectating or see on your screen. It’s a quick and efficient way to test out different crosshairs used by others.
Best CS2 Crosshair Settings
Choosing the best crosshair is subjective, depending on what feels most comfortable for you. However, many players opt for:
- Static Crosshair: (
cl_crosshairstyle 4) For no movement while shooting. - Color Settings: A bright color like green or cyan for better visibility.
- Center Dot: Some players prefer to use a center dot (
cl_crosshairdot 1) for pinpoint accuracy.
Furthermore: Best Red Gloves in CS2/CSGO
How to Import/Export Crosshairs in CS2
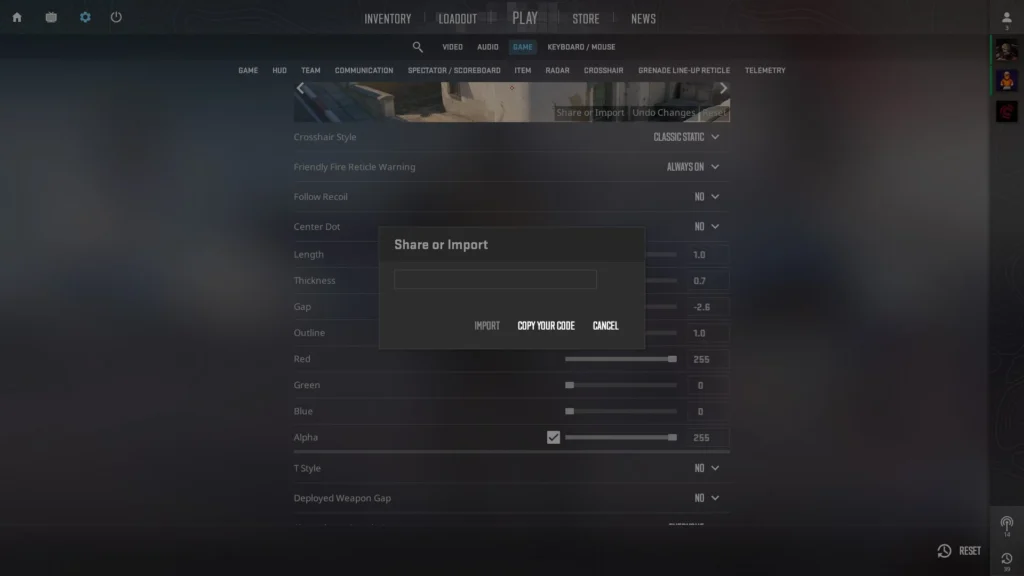
If you want to share or try out new crosshairs, you can import/export them using config files or workshop maps. Here’s how:
- Importing/Exporting Config: You can find your crosshair configuration in the config.cfg file in your game’s directory. Edit the crosshair-related commands, and you can share it with others or import another player’s config.
- Using Crosshair Maps: Alternatively, you can use crosshair generator maps available in the Steam Workshop to visually customize and try out new crosshairs.
Conclusion
Whether you’re a beginner or a pro, customizing your crosshair in CS2 can help improve your gameplay. By experimenting with different settings—either through the settings menu or using console commands—you can find a crosshair that fits your style perfectly.
Remember to try different sizes, colors, and styles to optimize your visibility and precision in every match!